After Effects: Thoughts on Modularly Creating Effects (and Creating a Modular Comic Panel Setup)
I originally wanted to write just the tutorial portion of this post, but quickly realized I’d like to share some of my thoughts on creating things modularly too, specifically in After Effects.
Often when I have some trouble achieving something in After Effects, I find that many tutorials don’t take advantage of the modularity of the software and resort to either destructive methods of achieving what they’re after or using a different piece of software altogether. While these methods are perfectly fine, I have trouble committing to something destructive, because I will only be able to undo that change in the moment, and once my project has been saved and the software has been closed, I can’t go back on my actions.
Sure, I could incrementally save the project as I go, and if I decided to change something I could go back to an old project, but I’ve only done this as a form of having a backup incase something goes wrong in the project, or I decide to redo something entirely. This is more important in 3D software where many more factors are in play, but the point stands it mainly serves for backup purposes. Frankly, even if it were possible to go back to an old project file and merge the changes into the new one, it’d end up being more of an inconvenience. I know because I’ve done this before, albeit manually, but setting up something modular beforehand will make everything more streamlined in the end. A lot of newer software seems to be taking this approach much more seriously, such as Substance, Houdini, and Notch.
All this being said, I’m honestly not the most creative person, and this is just how my brain is wired and how I express what creativity I do have, really. Part of the beauty I find in traditional art is it’s a very in-the-moment thing. A painting is essentially impossible to be reproduced exactly how it was because of many things that depended on the conditions at the time: how the paints were made, what the condition of the brush was, the condition of the canvas, etc., and as humans, we’re naturally imperfect in making anything. I view art as being inherently destructive, or “uneditable”, especially because once my work is out there, very rarely is there ever a reason to modify or add to it.
Before I go off onto a tangent further, to sum this up: however you make art is of course up to you and/or whoever you work with, and in the end, the general public will never see how it was made. I just wanted to write a bit about my thoughts on it and how my brain works to maybe offer a better perspective of how I work… and maybe so I can understand myself a bit more, I realize now it’s becoming more apparent I should pick up Houdini…
Anyways, onto the tutorial!

超!エキサイティン!!
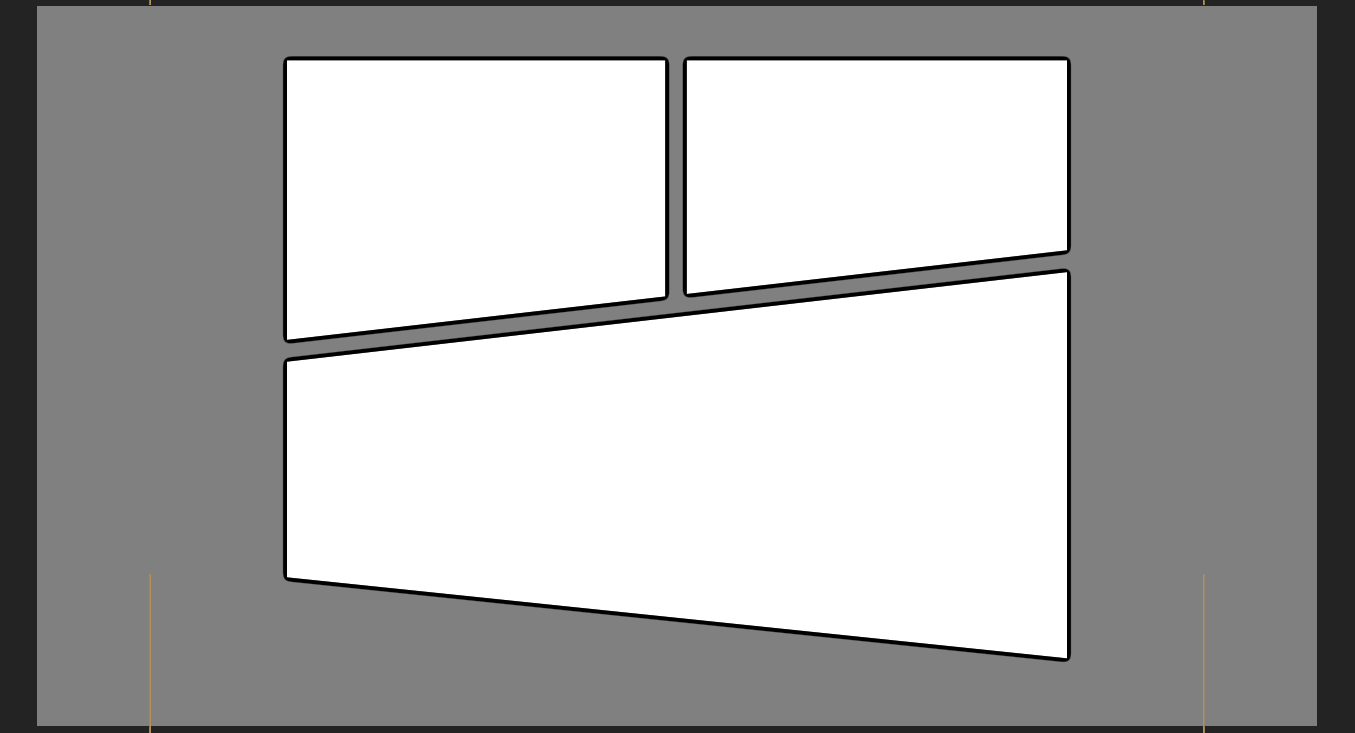
There’s two methods of accomplishing this comic panel setup, but both start the same way, which is creating the panels themselves. The easiest way is with shape layers and to “slice” sections of a rectangle with the Merge Paths modifier.
Simply set up a shape layer with two groups, one for the base shape (a rectangle here) and one for the slices. Then you can create a group for the slice, and duplicate it as needed to shape out the comic panel how you’d like.

Base rectangle, Merge Paths disabled…

Merge Paths enabled!

The stack of the shape layer
One nice feature of using shape layers is you could continue to modify this shape further, such as adding modifiers to round the corners, or distort the whole shape.
From here is where the tutorial splits off, one method more convenient and one more modular if you decide to make changes later.
The first method is once you have this comic panel layout, because there’s no built-in function to convert a shape layer to masks as far as I’m aware, is to auto-trace this shape layer and apply it as a new layer.

The auto-trace function can be found via: Layer -> Auto-trace. Be sure to use settings that don’t interfere with the shape.
From here, you can change the mask mode from Difference to Add, and duplicate this layer for as many masks as you have. You’ll have to manually turn down the opacity for each panel you don’t want, or you can apply this expression before duplicating the layer to the mask opacity, name your layer “Panel 1”, and then duplicate the layer as necessary. It might be ideal to lock your masks before duplicating your layer as well.
|
|
Your layer stack should look something like this now:
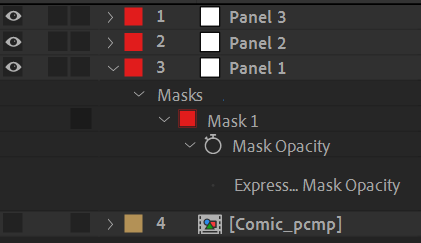
This is the end of the first method, from here you can then parent your footage to these layers and use them as mattes or however else you please. If you’re scaling up the panels at all, make sure you have the Continuous Rasterization switch checked.
The second method is a much more modular approach where you could modify your original shape layer setup, or even animate it if you wish.
First make sure your shape layer is in it’s own precomp, that way you can come back to your single shape layer instance whenever you’d like to make changes. Then on that precomp, add the Paint Bucket effect, move the fill point to one of the panels, and set the blending mode to Stencil Alpha. Setting the tolerance to 150 seems to be the sweet spot for making sure the alpha of the panel’s edges aren’t changed as well. This will essentially cut out a single panel that you can then use in the same way the panels were cutout with auto-traced masks as done prior.

A closer look at the Paint Bucket effect properties
From here you can duplicate the layer and move the paint bucket’s fill point to each of your panels’ location.
This could be the end of the tutorial but let’s have a little more fun with this modular setup. What if we wanted to have an outline around the panels? Or move our panels individually?
We already have a matte for our panel so we don’t really want to interfere with that, and duplicating the layer would mean if we wanted to make changes to that panel, such as changing the fill point or modifying an effect, we might have to make changes to two layers. An easy way to get around this is copying the layer as-is into a solid, and one way to do this is using the Compound Arithmetic effect.
Create a new solid, comp size, enable the Continuous Rasterization switch, and add the Compound Arithmetic effect, setting the source layer to the comic panel precomp (with Effects & Masks), and setting the operator channels to ARGB to make sure it includes the alpha.

Who knew arithmetic could be useful in AE
This setup allows you to have an exact reference of your specific comic panel layer incase you made changes to it, such as changing which panel it’s using, without linking properties via expressions.
So what can we do with this? One of the most simple things is adding an outline to this layer. You could do this via layer styles at this point, or if you want a strictly effect-based approach, use an effect stack like this one, after the Compound Arithmetic effect:

Effects FTW!
What we’re doing here is slightly blurring the panel, crunching the alpha (which has now been expanded because of the blur), cutting out the original panel with the Calculations effect using the comic panel layer set to Silhouette Alpha, and then setting a color for the outline. There’s some slight alpha bleeding inbetween the panel and the outline that can be fixed by using a Simple Choker and setting it to a small negative value, somewhere from -1 to -2 works well. Layer styles don’t have this issue, but layer styles of course have their own issues, something to write about for another time…
Once all your panels are set up it should be something like this!
At this point you can lock your solid layers and simply move your precomp layers to move the panels, and the outlines will move with them! You’ll notice the layers will break if you move them too far, because the Paint Bucket effect doesn’t respective layer position, but you can fix this by either offsetting the fill position with the layer position, or adding the Transform effect and transforming the layer from there. Using the Transform effect is a lot nicer because this takes care of modifying the scale, rotation, skew, etc.
Because of this setup of separating the panel and outline into their own layers, we can apply effects independently to these layers to achieve some neat effects. One such example would be applying a Linear Wipe to the panel precomp, which will automatically propagate to the outline layer.
This setup maintains the outline too!
To close things out, here’s a simple animation using some of the above techniques, such as the Transform and Linear Wipe effects.
3Dアクションゲーム!
Retains the ability to be modified, and doesn't impact the animation!
I think that about covers everything. If you had any trouble following this tutorial at all, you may refer to the project file by checking the link below. And of course if you have any feedback, please feel free to leave a comment! I haven’t written out a tutorial like this before so I’d be interested to hear what people’s thoughts are.